|
How to create a JPEG file for digital competition entry
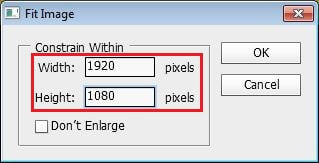
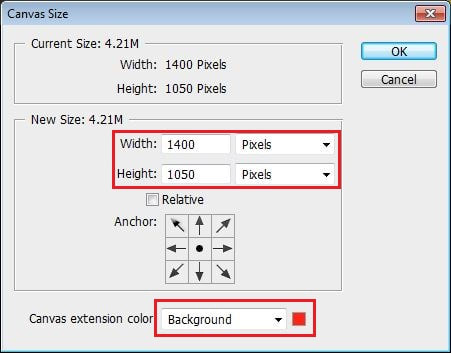
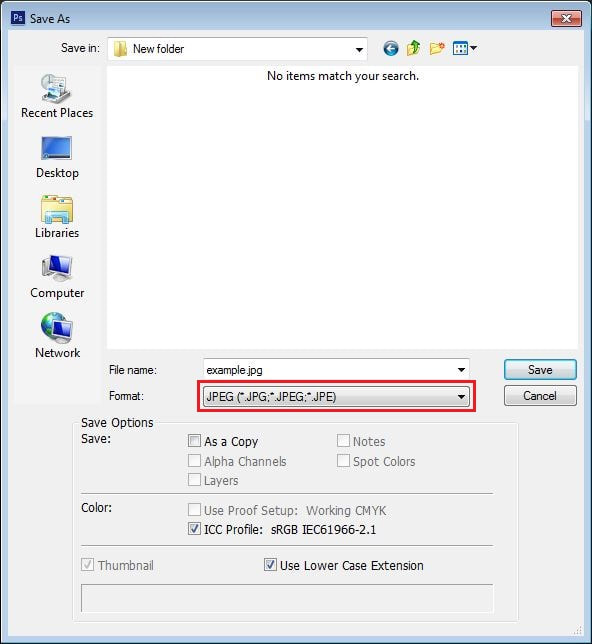
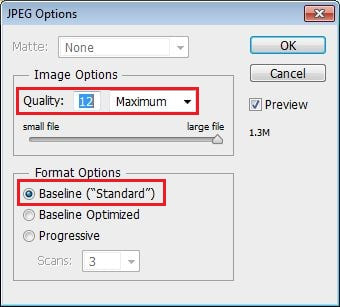
These instructions will guide you through the steps of creating a JPEG file for entry into digital image competitions using Adobe Photoshop. Resizing your image The digital image will be judged at a maximum resolution that will be given in the competition rules, this varies from club to club and is dependant to a large extent on the capabilities of the digital projector used. Arnold and District Camera Club use a maximum resolution of 1920 pixels horizontal by 1080 pixels vertical and this will be used in the examples below.If the competition you are entering has a different maximum resolution (for example at the time of writing NEMPF use 1400 by 1050 pixels) then substitute these values in the examples Method 1 Horizontal (Landscape) images 1. From the Image menu, select Image Size, the Image Size dialog Box is displayed: 2. Make sure you have the Resample Image andConstrain Proportions boxes ticked. 3. Make sure the units you have selected are pixels (top centre of the box). 4. In the Pixel Dimensions section enter the Width you want, for example 1920 pixels. The height will adjust automatically providing you have the Constrain Proportions box ticked. Note that it is unlikely that the height will match the maximum height. 5. Finally check the height, if this is more that the maximum (1080 for A&DCC), then you need to enter 1080 in the height box – note that this will reduce the width to less than 1920 pixels. 6. Click OK. Tip: You can ignore the Document Size parameters (Width, Height and Resolution) as these are irrelevant here as we are only interested in the pure pixel size of the image. Vertical (Portrait) images 1. From the Image menu, select Image Size, the Image Size dialog Box is displayed: 2. Make sure you have the Resample Image and Constrain Proportions boxes ticked. 3. Make sure the units you have selected are pixels (top centre of the box). 4. In the Pixel Dimensions section enter the Height you want, for example 1080 pixels. The width will adjust automatically providing you have the Constrain Proportions box ticked. Note that it is unlikely that the width will match the maximum width. 5. Finally check the width, if this is more that the maximum (1920 for A&DCC), then you need to enter 1920 in the Width box – note that this will reduce the height to less than 1080 pixels. 6. Click OK. Method 2 1. From the File menu select Automate. 2. From the Automate menu select Fit Image..., the Fit Image dialogue box is displayed: 3. Enter the maximum Width and Height. 4. Click OK The image will be resized to fit the constrains entered. Extending the canvas (optional) If your image is not exactly the maximum pixel size the image will be displayed with a black background filling the remaining space. This is to be recommended for most images, however if you wish to use a different colour or the competition rules state that the canvas must be a particular size, one way of achieving this is as follows: 1. Set the background colour on the colour palette to the colour you want (red in this example). (An alternative is to select the required Canvas extension colour in the Canvas Size dialogue box - see below). 2. From the Image menu, select Canvas Size. The Canvas Size dialog box is shown: 3. Make sure the Anchor is set to centralise the image. 4. Make sure the units are set to pixels. Type in the Width and Height required. (1400 by 1050 for N&EMPF) 5. Click OK. Your image canvas is now enlarged to show the picture with the spare margins filled with the background colour selected (red in the example) around the outside. Saving the image 1. To save the image as a JPEG file, from the File menu select Save As and the Save As dialog box will be displayed: 2. In the Format field, make sure that JPEG is selected. Tip: If the JPEG option does not appear in the list, it is likely that you have an image in 16 bits per channel mode, to change this, from the Image menu select Mode and make sure that 8 Bits/Channel is selected. 3. Select the folder you want to save the file to (Competitions in the example right). Type in the correct File name (remember, it must show the image title followed by “by” followed by your name). 4. Click Save, you will then see the JPEG Options dialog box: 5. Make sure the Format Options is set to Baseline (“Standard”). 6. Set the amount of compression to apply to the image. The Quality should be set to 10 or 11.This will ensure that the final file size is not too large but will retain the quality of the image. 7. Click OK. |


